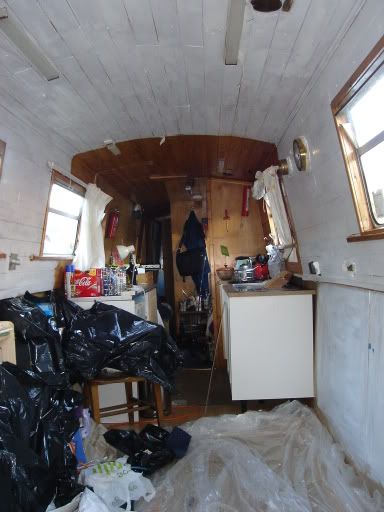
Friday, April 07, 2006

Fireplace.


I bought the squirrell and all components from Uxbridge boat centre who have provided excellent service and care. I had been looking at it all until one very cold evening when I was so cold I thought I was going to be sick, so I went onto the roof with my drill and jigsaw and set to drilling a hole in the roof. It was so cold, my pint glass of water actually froze!!!!!!

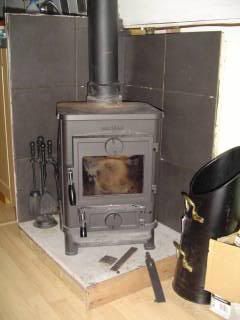
I inserted the collar into the new hole and sealed around it with high temperature silicon gel, I did use fire cement the first time, but realised my mistake when it started raining - fire cement is not waterproof and takes ages to go off! The silicon sealent is red, and so is my roof - phew!!!! The stove sits on a peice of marble I found behind a gate and managed to buy off the owner, which in turn sits on a 2x2 frame of wood. The stove is secured through the marble (I drilled a hole) onto a piece of ply that sits under the marble on the 2x2 frame.

The flu fits tighly into the stove, but I put fire cement around it anyway, and then up through the ceiling into the collar. I cut the ply wood back quite a way - and cut the insulation (polystyrene) back even further - as far as my claws would reach. I have fire board over the top of it (a square thereof). I also used fire proof rope where the flu meets the roof collar but that is a tight fit also and it took a while to shove it up there!

The surround is fireproof board again secured either onto ply and then the cabinet in the kitchen, or on a frame and to the battens on the hull. I used felixble tile adhesive and am still amazed they are still stuck on the board. I did not treat the board becuase I got confused.

Tiling is very messy and great fun. They are put up with character.....!!! (I never claim to reach the dizzy heights of amateur in my fitout, rather with good humour!)

Thats the stove. I don't think I have missed anything. The door did leak at first, but I took it off, took it to uxbridge and they sorted it out without no hassle.

Some Photographs

When working on the boat, I always forget to take photographs!

This is the 'saloon' as boaters call it - I am not sure this is a name I particularly like, but as this clearly doesn't fall into the category of drawing room, I regard it as the sitting room - ish. The stove is not yet in place.


A friend came and stayed with me for a week and sorted out the electrics - up until he arrived in November I was living without any at all. I did have a candle - but I didn't find I could read comfortably by it so I would often not even have that. Darkness became my friend - so much so, even my neighbours didn't realise I lived aboard! The water tank had only just been fitted under the front deck too - but at least I had one cold tap! Until then I used a bottle filled up from a remote tap.

Here is the back of the new control electrics control panel. This was moved to the from the other side of the boat which was much more satisfactory as all the new wiring entered that side:


Prior to the excellent assistance of the electrical genius the electrics were a complete nightmare - C=cables were frayed, bare in places, changed colour half way through, and were independently condemned by several professionals. The new system is much better, but still not complete - that will take a while.


It was during this week that I fitted the stove - the evenings were bitterly cold, and although we were staying at my other friends house for the duration of the week, leading up to it had been miserable. One particularly cold evening I sat on the roof and drilled a hole through it - it was so cold my pint glass of water froze.

The following day I did a bit more before I went away for the weekend. My friend ground the flue to the correct length and angle for my return.

Sunday, April 02, 2006

Re-Fit

Having taken the boat apart from the bathroom to the front door with the act now think later stratergy I had to do some serious rebuilding.

The kitchen came first. I was planning to make the cabinets myself, but one small experiment led me rapidly to B&Q for pre manufactured units. They are seriously easy to fit.


Next came the floor at the front of the boat. I had assistance for this!


Laying the floor wasn't as simple as it could have been. The watertank that was in this area sat on the hull base, which meant there was a hole in the floor - which didn't prove easy to fill up and make level. Thanks for a bit of experimentation it worked out ok in the end. I was delighted to have assistance on this day, there is no way I could have done it on my own!

Having put a lovely floor down the rest of the boat began to look very old and tired. Living in a workshop was also having its affect, and I just didn't know what to do about the whole environment so, on the advise of a couple of people, and to the horror of others I did what I would NEVER have done normally and picked up a paint brush. The boat went from this:


to this:


I am still a bit tentative about having painted the inside of the boat, however, on reflection I think it was the best thing I did. The woodwork was tired, and short of pulling it all off and doing it properly there wasn't much I could do with it. I felt I had enough work to do without doing that, so paint it was.

I will post some finished product pictures in my next post.